 Before you begin
Examples
Quick start guide
Widget descriptions
Publishing
FAQ
Before you begin
Examples
Quick start guide
Widget descriptions
Publishing
FAQ
Architect is a WordPress-based longform template developed by de//space to help tell your important journalism in a more impactful way.
It is not for your everyday story, your Sunday package, or just because a story happens to have really good photos. This is for your #journalismwithimpact. Your special investigative and enterprise pieces.
With that, there’s a few things you need to know before getting started:
You must plan for this well in advance. You will need to know the structure of your story and have a firm grasp of all of the visual elements at least three weeks before publication and before you request use of the template.
Someone on your staff should have working knowledge of WordPress, or similar CMS. Your team will be building the story in WordPress.
Read through the documentation below to understand how the template is built.
Take a look at the examples to see how others have been using Architect.
When you're ready, fill out this form to request a site set-up:
More than 20 projects have launched on Architect to date and we hope yours will be the next! Architect was designed to be a solution for newsrooms large and small.
Check out some awesome examples of Architect in action from these sites:
Bucks County Courier Times, The Intelligencer & Burlington County Times
The Ames Tribune
Into the Light (GateHouse Iowa)
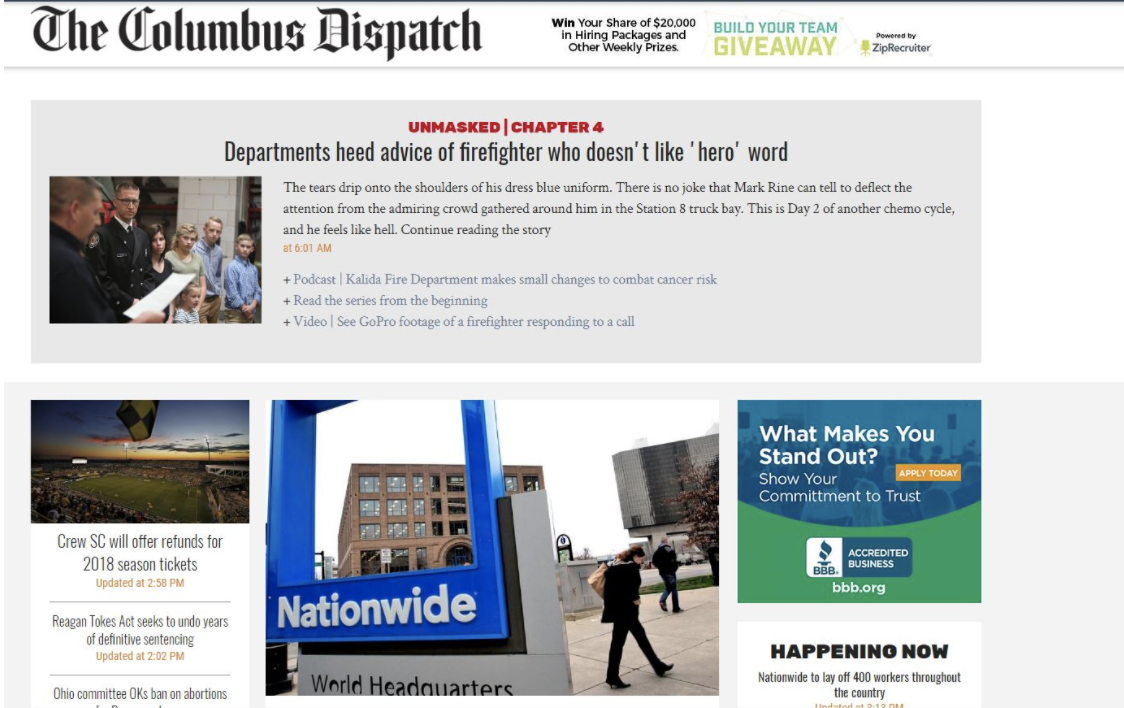
The Columbus Dispatch
The Daytona Beach News-Journal
The Fayetteville Observer
The Gaston Gazette
The Lakeland Ledger
The Topeka Capital-Journal
Quick start video
This video will give you an overview on how to use Architect. The instructions are also written below.
Step one: Accessing the WordPress editor
You will access the WordPress site editor by going to http://gatehousenews.com/{yoursitename}/wp-admin.
The value in {yoursitename} is the name of the site that you emailed during setup.
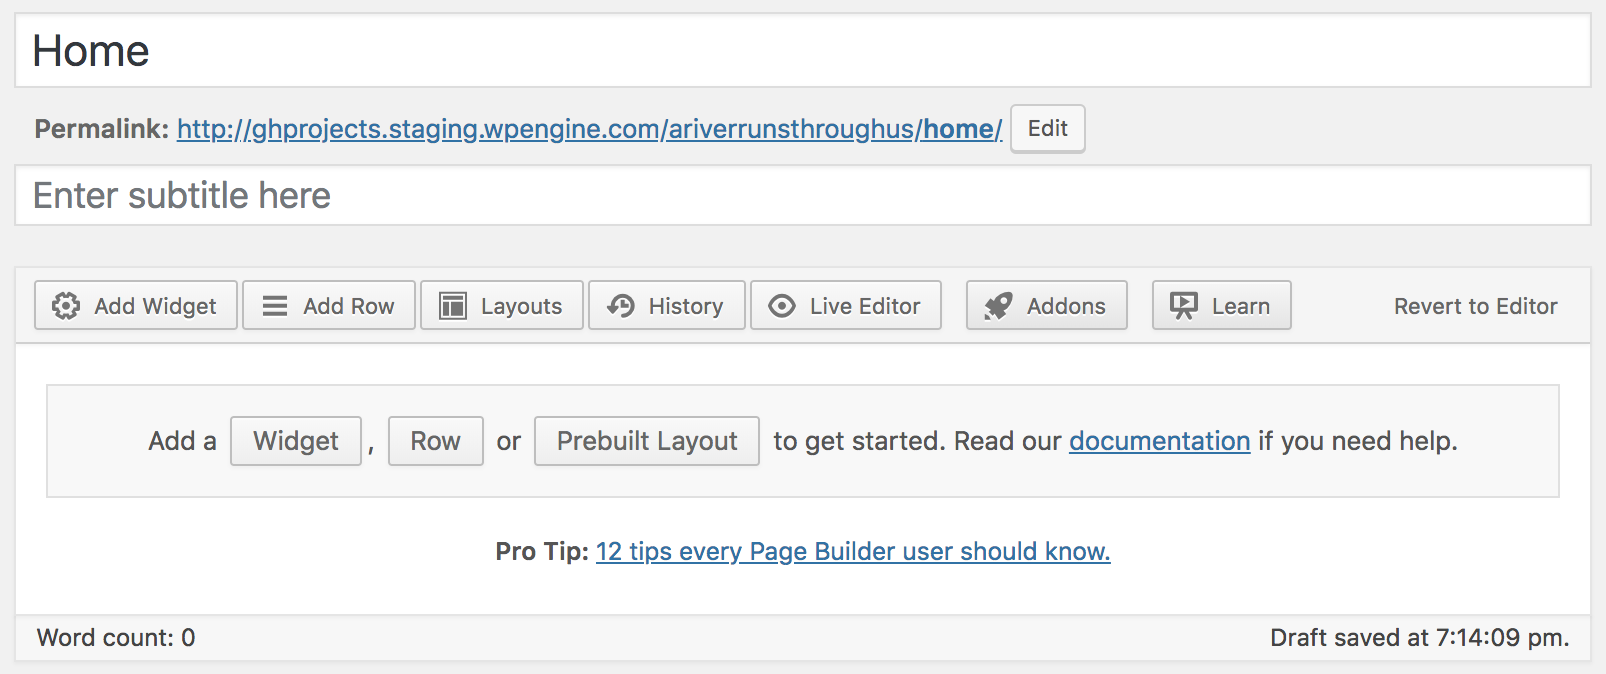
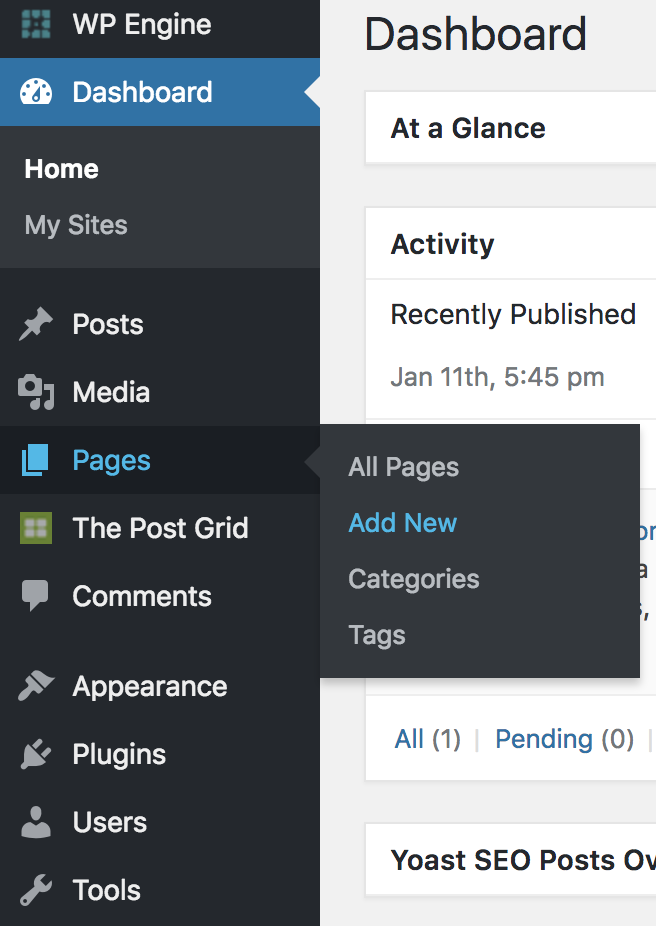
You will be greeted by the WordPress dashboard. On the left, click on 'Pages' and then click the 'Home' page to begin building your site.

You should see something similar to the above.
Important: You will need to click on the 'Page Builder' tab on the top right of the editor to switch from Visual or Text to Page Builder. Page Builder is required for using this template.
Page Builder allows for rows and widgets. In general, you will want to first create a row and then add widgets to the row. The table in the widgets section outlines which widgets need to be in a row and which ones do not.
For the purposes of this quick start, let's first add a widget that does not require a row. Click 'Add Widget'.
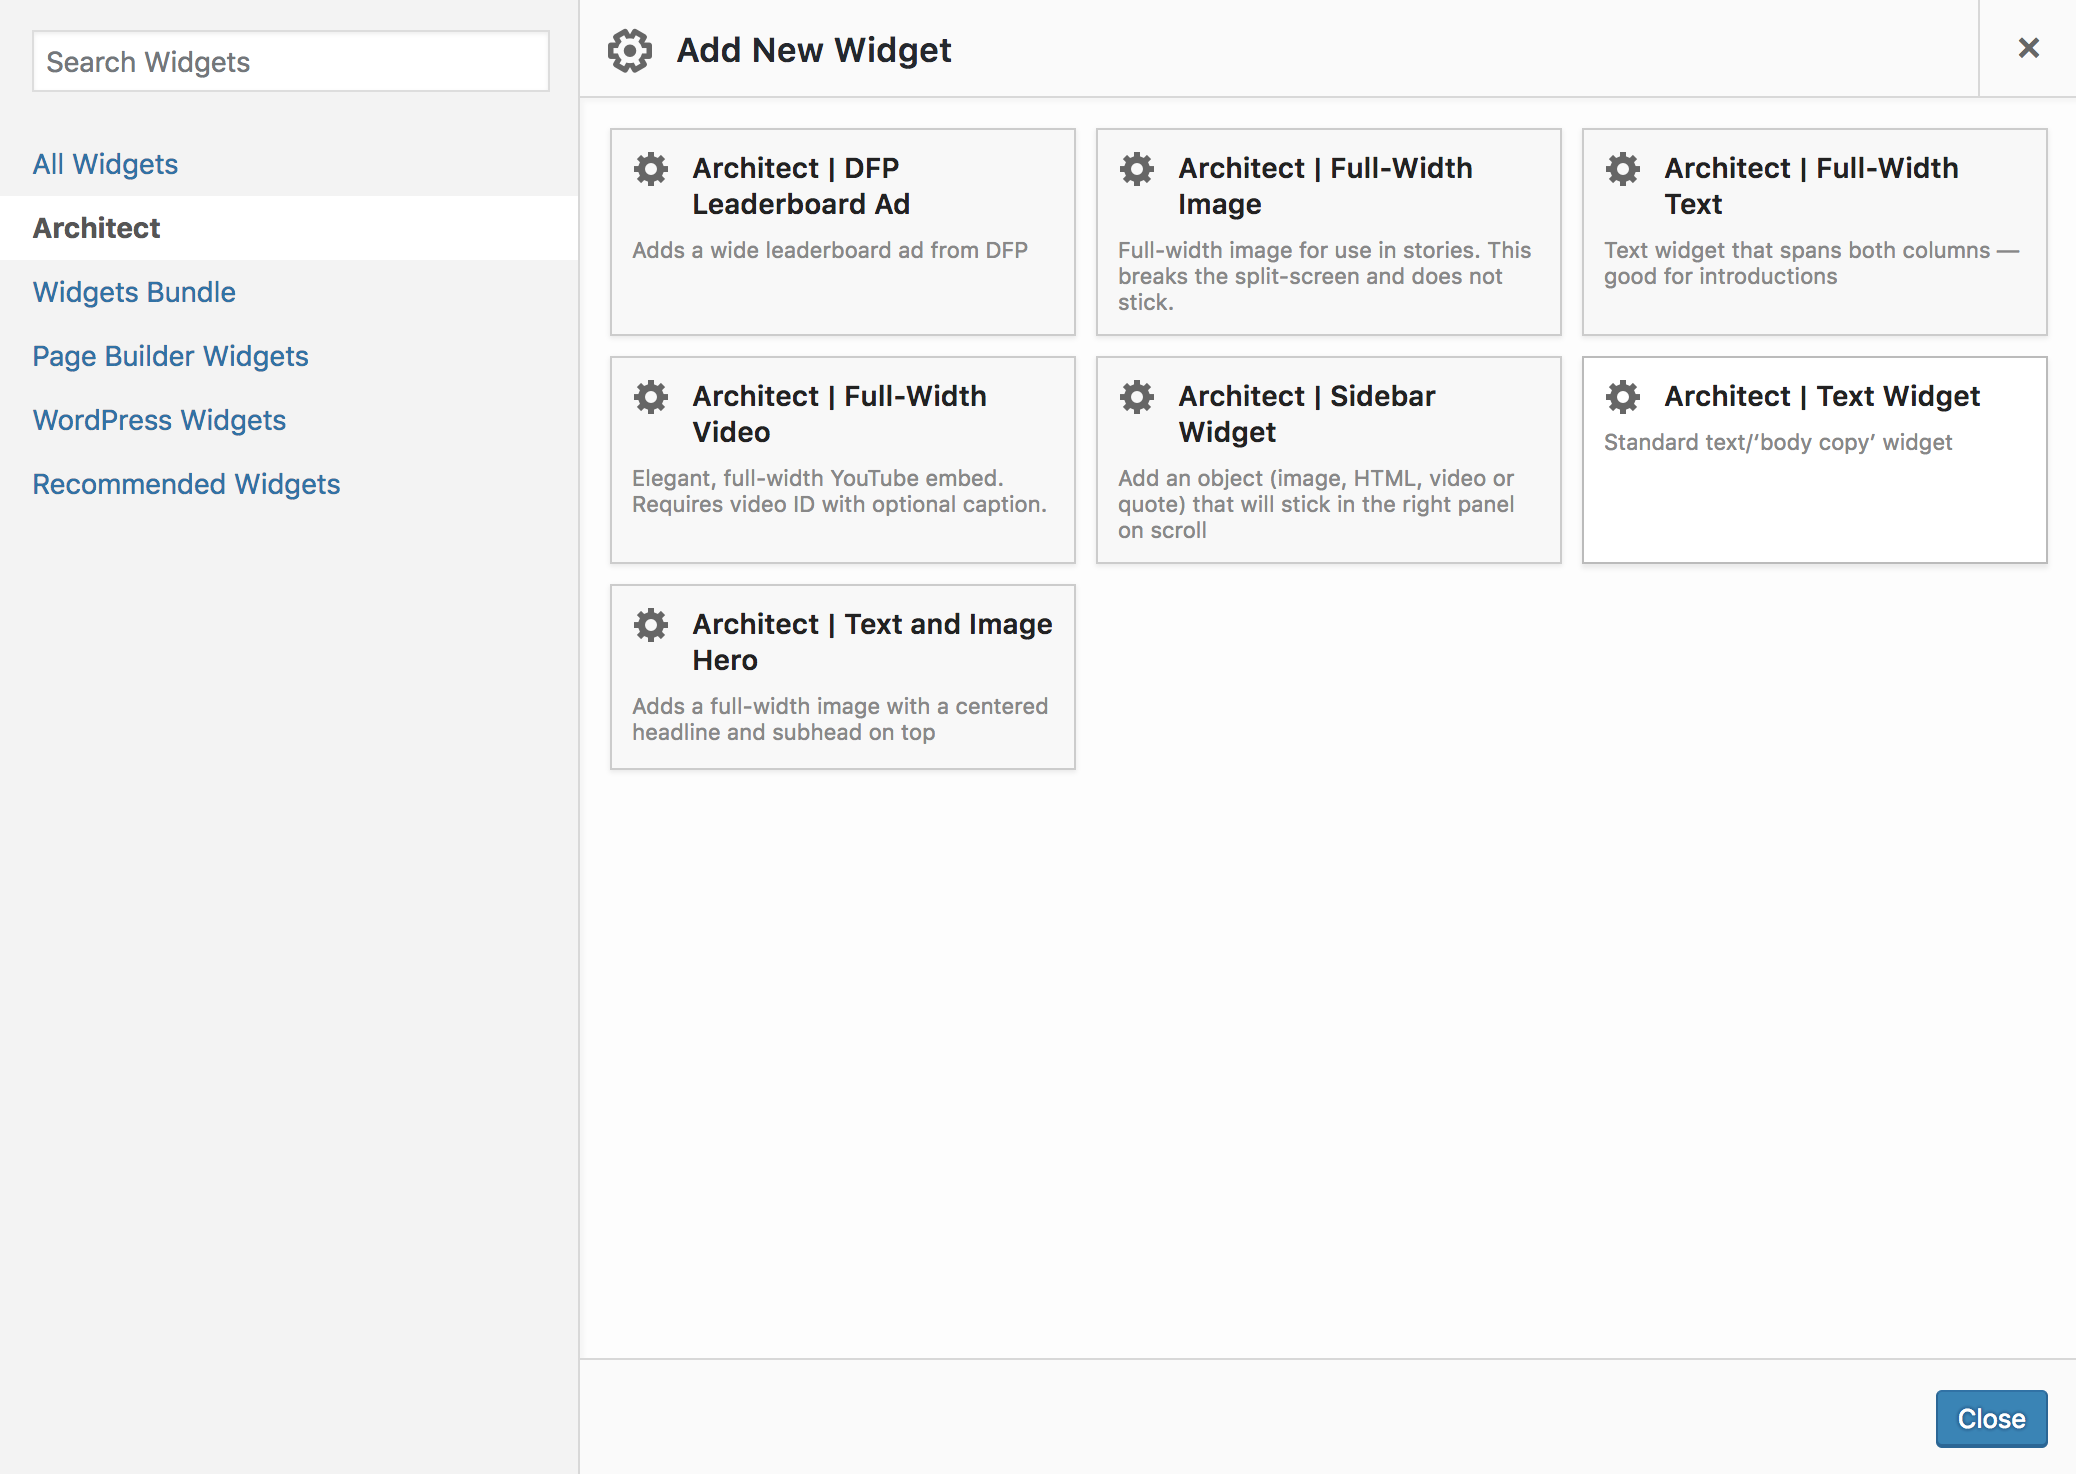
On the left side, click on 'Architect'. This will show you only the widgets associated with the Architect theme. You may use widgets outside of the Architect theme, but we make no guarantee that they will work. Architect was designed to include a variety of tools you would need to tell longform stories.
We'll start with the Architect | Text and Image Hero widget.
Click on that widget, and it will be added to your Page Builder. Click on the 'Edit' button on the top right of the widget to begin working on it.
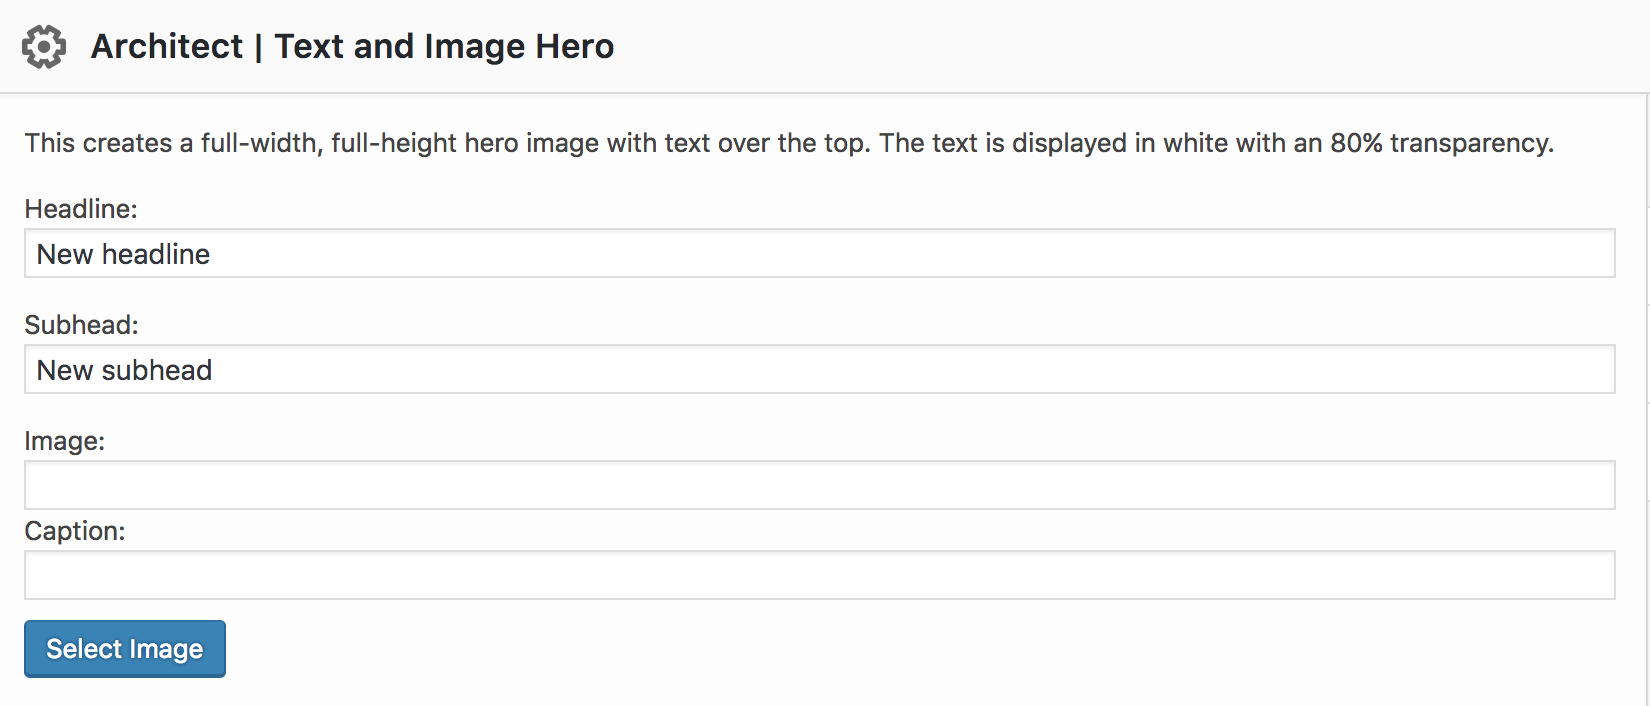
In the 'Headline' field, type what you want to appear as the headline for the page. This will be placed over the image. The same is true for the 'Subhead' field, though it is optional.
Click the blue 'Select Image' button to upload or select an image. In the window that appears, clicking the 'Upload Files' tab will allow you to upload a new image to the site. If you have previously uploaded media, it will appear under 'Media Library'.
Once you've chosen your image, click the 'Select' button. It will automatically fill in the image URL and caption — feel free to edit the caption if you need to.
Click 'Done' and then the big blue 'Update' button on the right side.

If you click on the 'View Page' link on the green 'Page updated.' bar, you should see something like this.
Important:
The URL you are looking at is for preview purposes only. For that reason, you will not see your property's name in the top left and the DFP ads widget will not work.
Your actual URL structure is as follows:
http://gatehousenews.com/{yoursitename}/{yourpagename - usually home}/site/{newspaper.com}
For example, if you are the Columbus Dispatch, your site name is Unmasked and you didn't change the page name from Home, your URL would be:
http://gatehousenews.com/unmasked/home/site/dispatch.com
You may find it helpful to keep a tab open with your actual URL so that you can see exactly how the site should look when you publish it.
Now, back to the editor.
The process is the same for adding other widgets. Let's go through one more example where we use two widgets that require placement in a row.
On the Page Builder toolbar, click 'Add Row' (next to the 'Add Widget' button clicked earlier). You will be shown a window that lets you decide how the row should be split — in most cases, 50% 50% should be perfect. Click Insert.
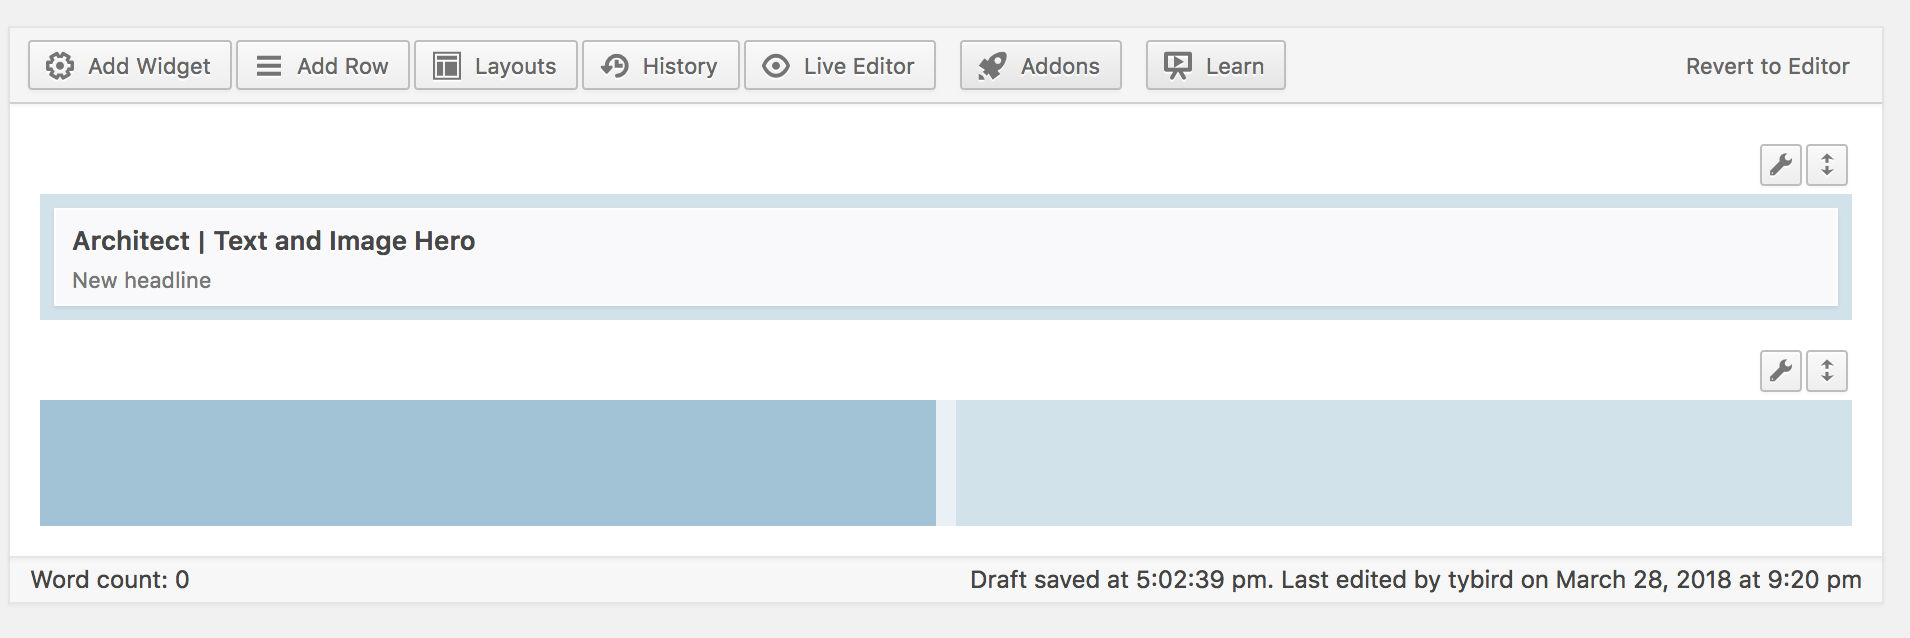
This creates a new row. To add a widget to a row, you must first click on where the widget should go — in this example, I clicked the left portion. When a side of the row is dark blue, you can click the 'Add Widget' button to add something to that side of the row.
Since this is the left side, let's add an 'Architect | Text Widget'. Click the small 'Edit' button on that widget and fill in the appropriate fields. Click 'Done'.
Now, click on the right side of the row to make the empty space dark blue. Click 'Add Widget' and this time let's add the 'Architect | Sidebar Widget'.
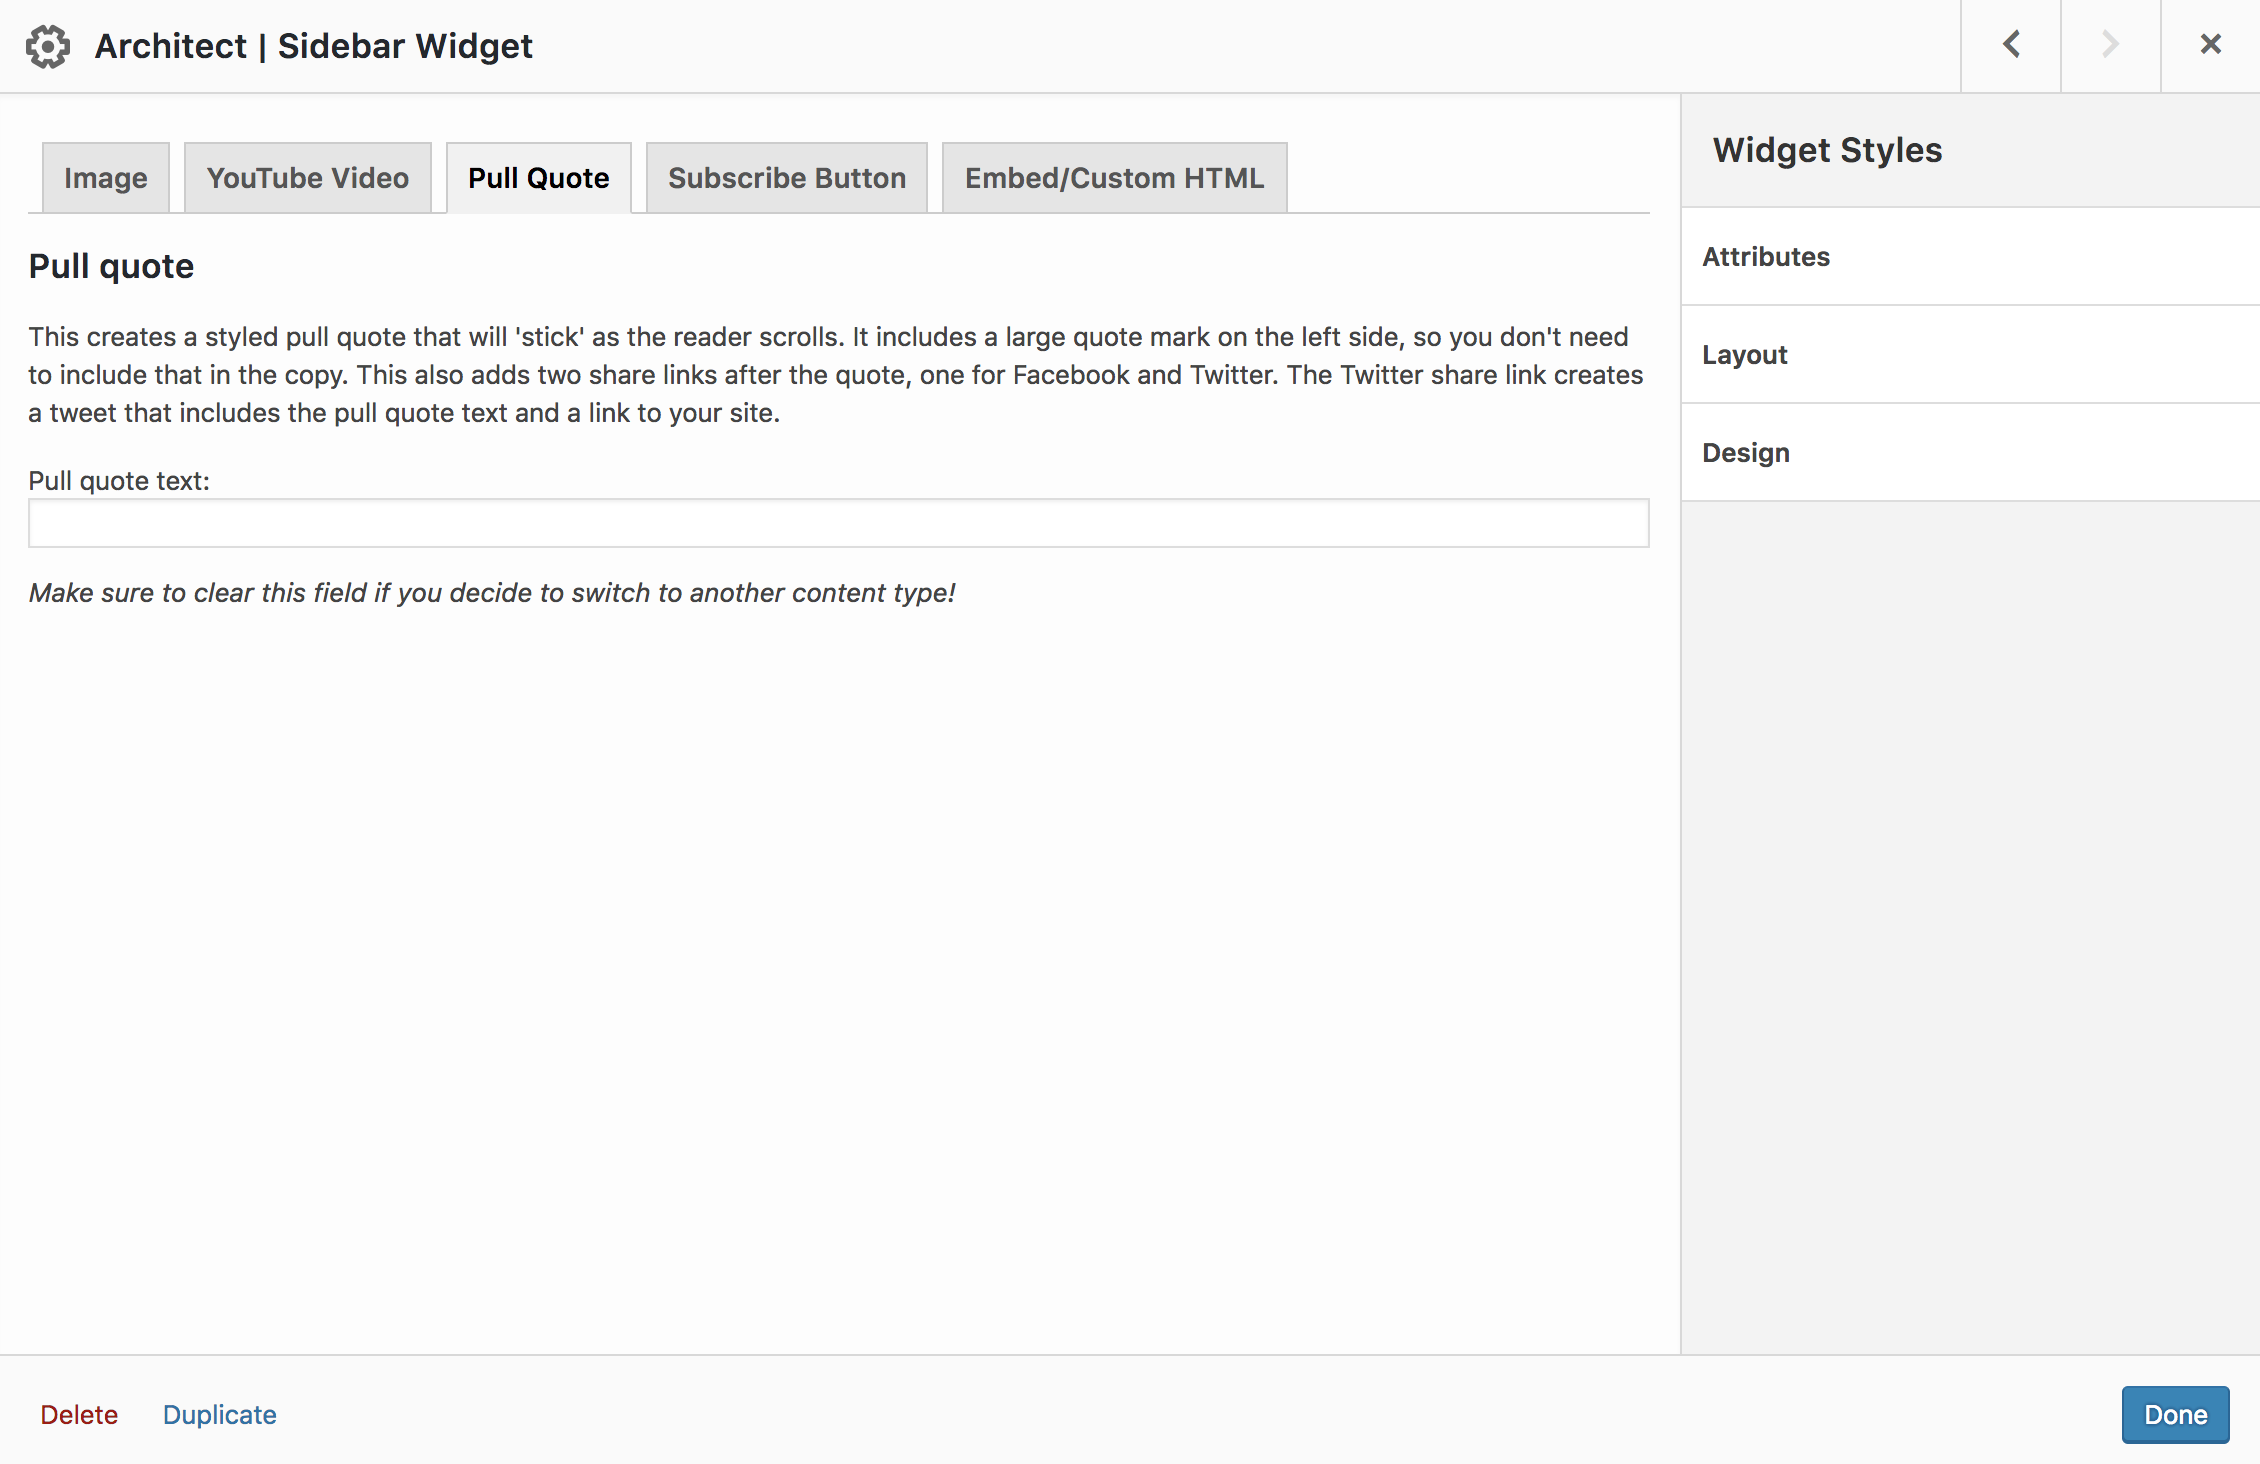
You'll notice this widget is a little bit different — it has tabs! The sidebar widget allows for many different content types in the same widget. For this example, click on the 'Pull Quote' tab. Enter some text to make a pull quote, then click 'Done'.
Note: if you change your mind about what content type to use, you'll need to clear out that field. For example, if you first make a pull quote but then later decide you want an image, you'll need to clear the text out of the pull quote field before choosing the image. A safer option would be to delete your mistake sidebar widget and add a new one with the content type you would like.
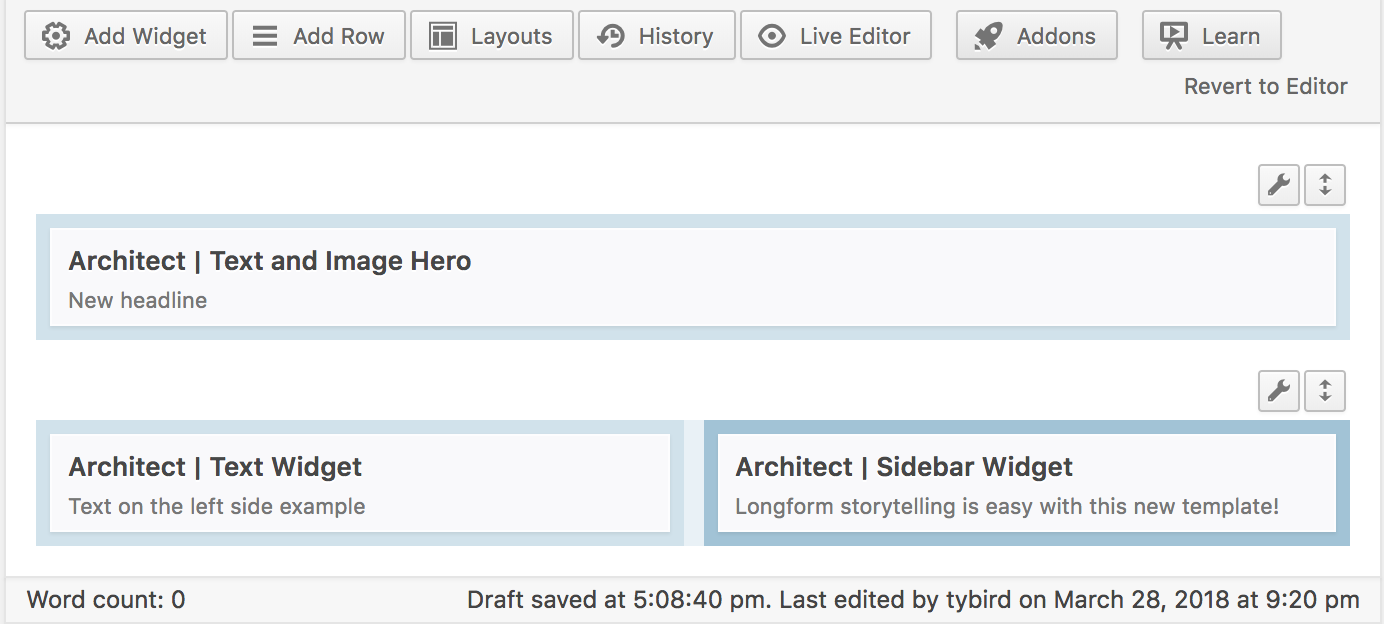
Your Page Builder should now look something like this. Click the blue 'Update' button and take a peek at how your site is looking.
Continue building like this, using the widget descriptions below. When you're ready to go live, see the publishing section.
| Name | Description | Requires row? |
|---|---|---|
| Architect | DFP Leaderboard Ad | Adds a remnant ad served from DFP that is centered, full-width on the site. The widget includes a field to enter an ad keyword. If you don't have a certain keyword to use, you can leave it blank. | |
| Architect | Full-Width Image | Creates an image that spans the entire width of the browser window. Includes space for a caption. | |
| Architect | Full-Width Text | Perfect for creating headlines or text leadins to the project, this creates a centered text block that spans almost the entire width of the browser. It includes a space for a headline, lead-in, byline and body copy text. | |
| Architect | Full-Width Video | Much like the full-width image, except that this widget looks for a YouTube video ID and caption. It creates a full-width video player with a caption (if included). | |
| Architect | Sidebar Widget | This mutifunctional widget allows you to add an image, YouTube video, pull quote, subscribe button or custom HTML (embed) to your site. What is unique about this widget is that it 'sticks' as the user scrolls down (on desktop only). You should use this widget to the right of a Text Widget so that the contents of this widget stick as you scroll — for the length of its partner text widget. | |
| Architect | Text Widget | The companion to the Sidebar Widget, this creates a 'body copy' block that is designed to fit inside of a row. It includes space for a lead-in and byline. Keep in mind that the contents of this dictate the 'stick' length of the item next to it. For example, if you want an image to 'stick' next to five grafs, this widget should contain only those five grafs. Add more text widgets to create new sticky partnerships. | |
| Architect | Text and Image Hero | Designed to work as the top of your site, this creates a full-width, full-height image with a space for a headline and subhead. |
Pre-publishing checklist:
Copy is consistent across all versions
Full-width images look crisp
WordPress page is set to Status: Published and Visibility: Public
(see the 'Publish' box on the top right of your page and click 'Edit' to correct any values)
SEO and share text has been optimized (see below)
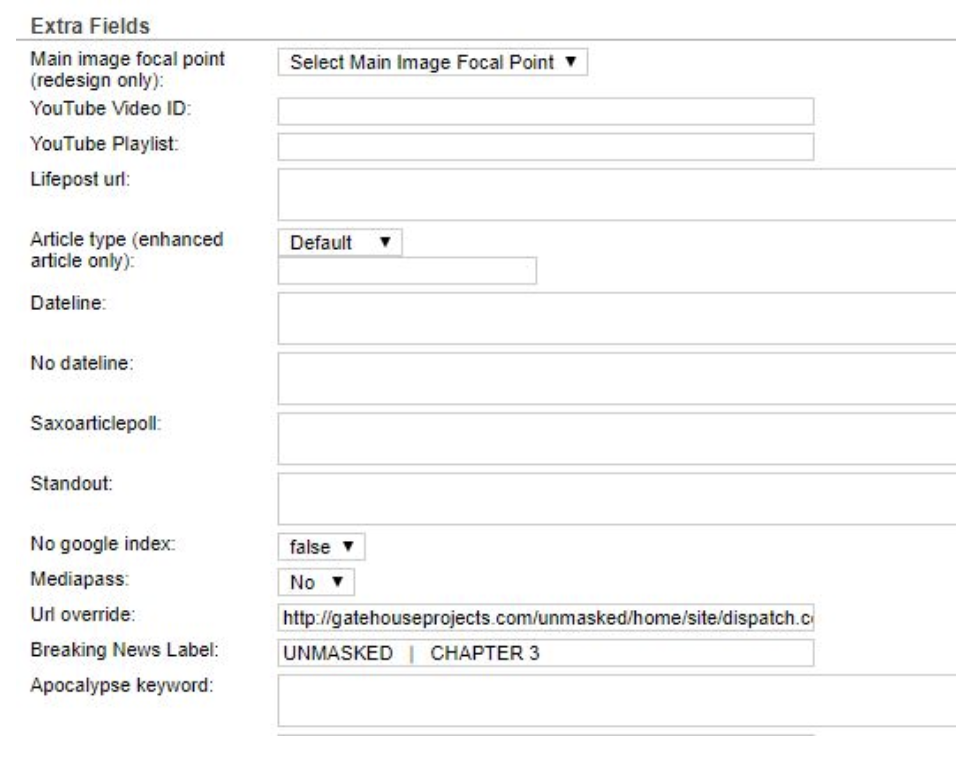
Story file with URL override has been created in EditUI (see below)
The Architect theme includes a tool called Yoast SEO that is helpful for improving your site's search engine rank and allows you to customize the share text that appears on Facebook and Twitter.
In the WordPress editor, scroll down past the Page Builder box to see the Yoast SEO plugin.
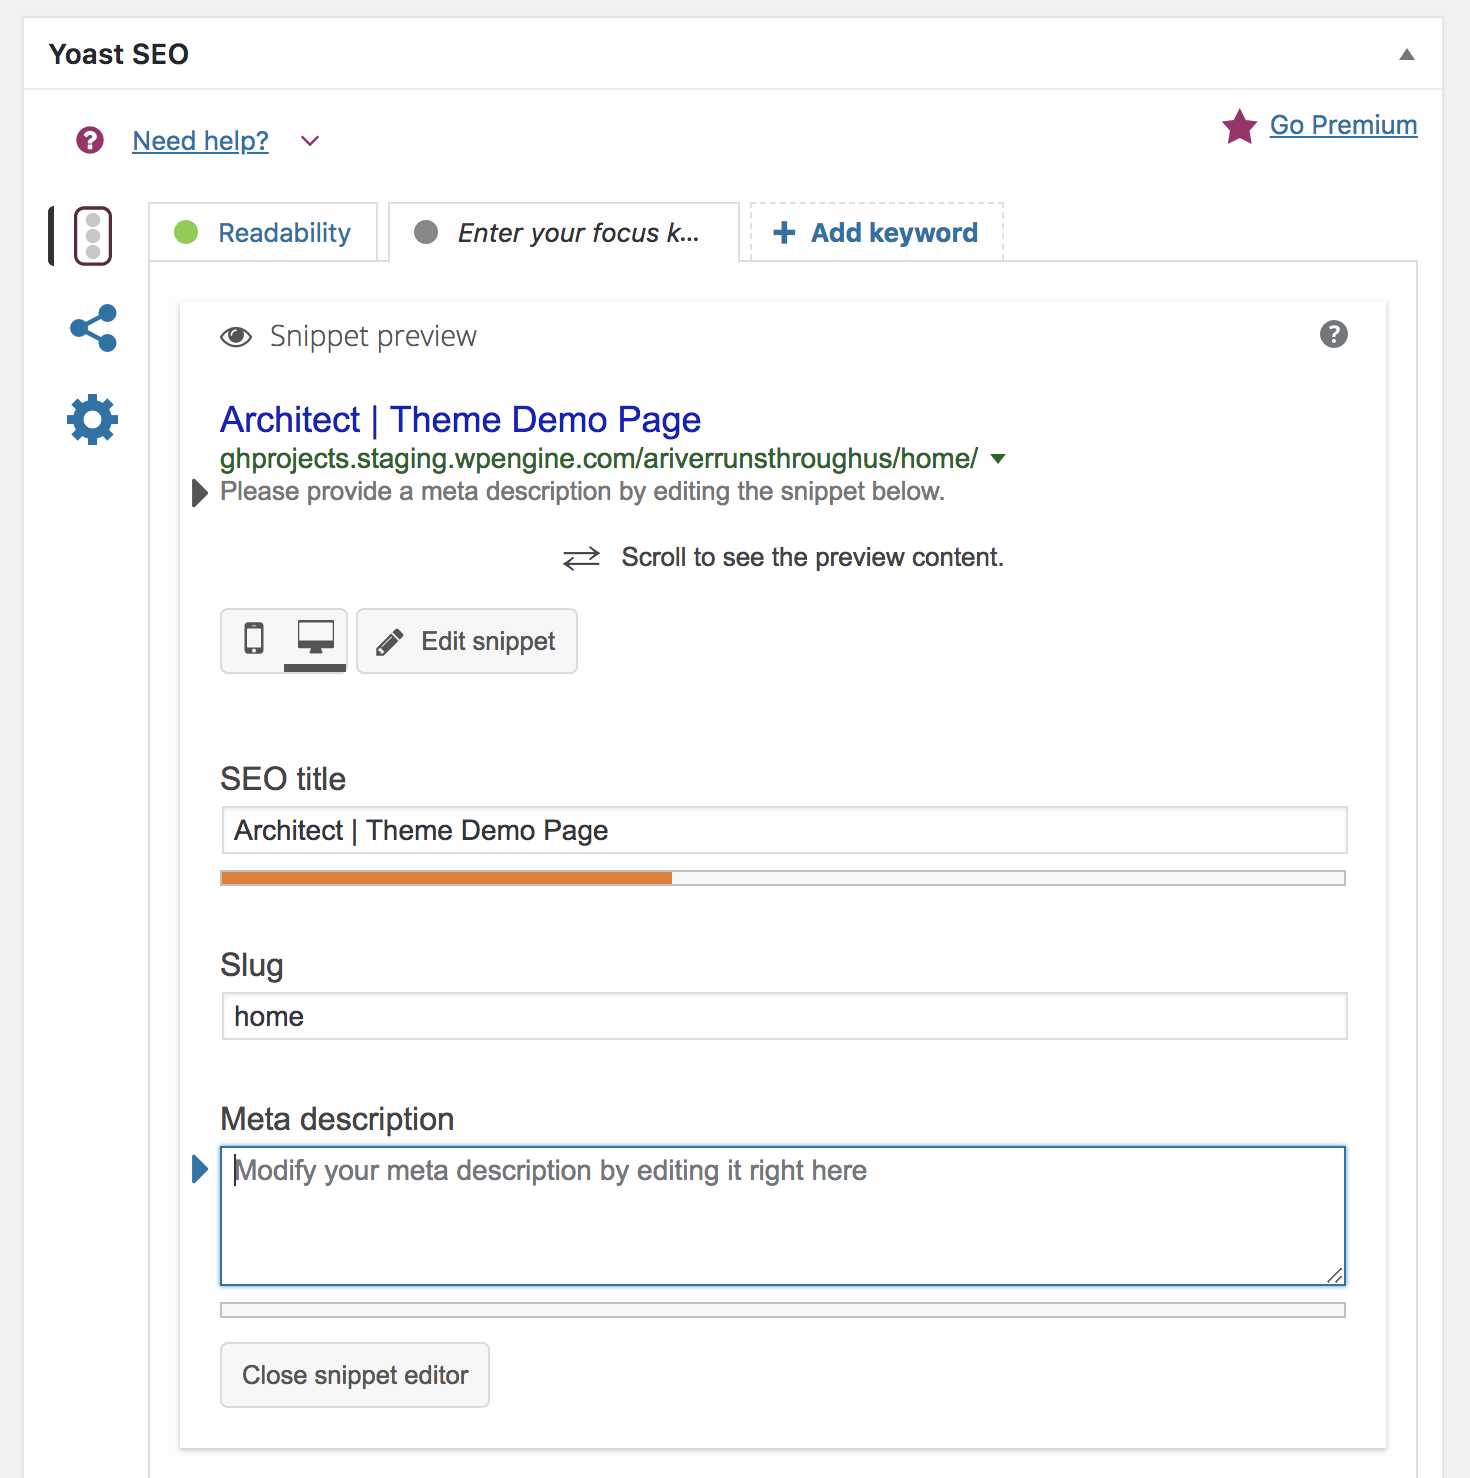
To ensure maximum reach on search engines, click on the 'Edit Snippet' button to make your screen look something like the image above. In the SEO title, give your page a descriptive title that includes your property's name. You will notice the length meter warns you when the title is too long.
The 'slug' should be 'home'. It's ok to change it here — it doesn't make a huge difference but users will see that link on their Google search so it's good to be descriptive.
The meta description is extremely important. Use as many descriptive, important words from your project here as possible so that search engine users can find your site. Again, pay attention to the length meter.
Now, click on the circles-connected-by-lines button on the left side of the Yoast plugin.
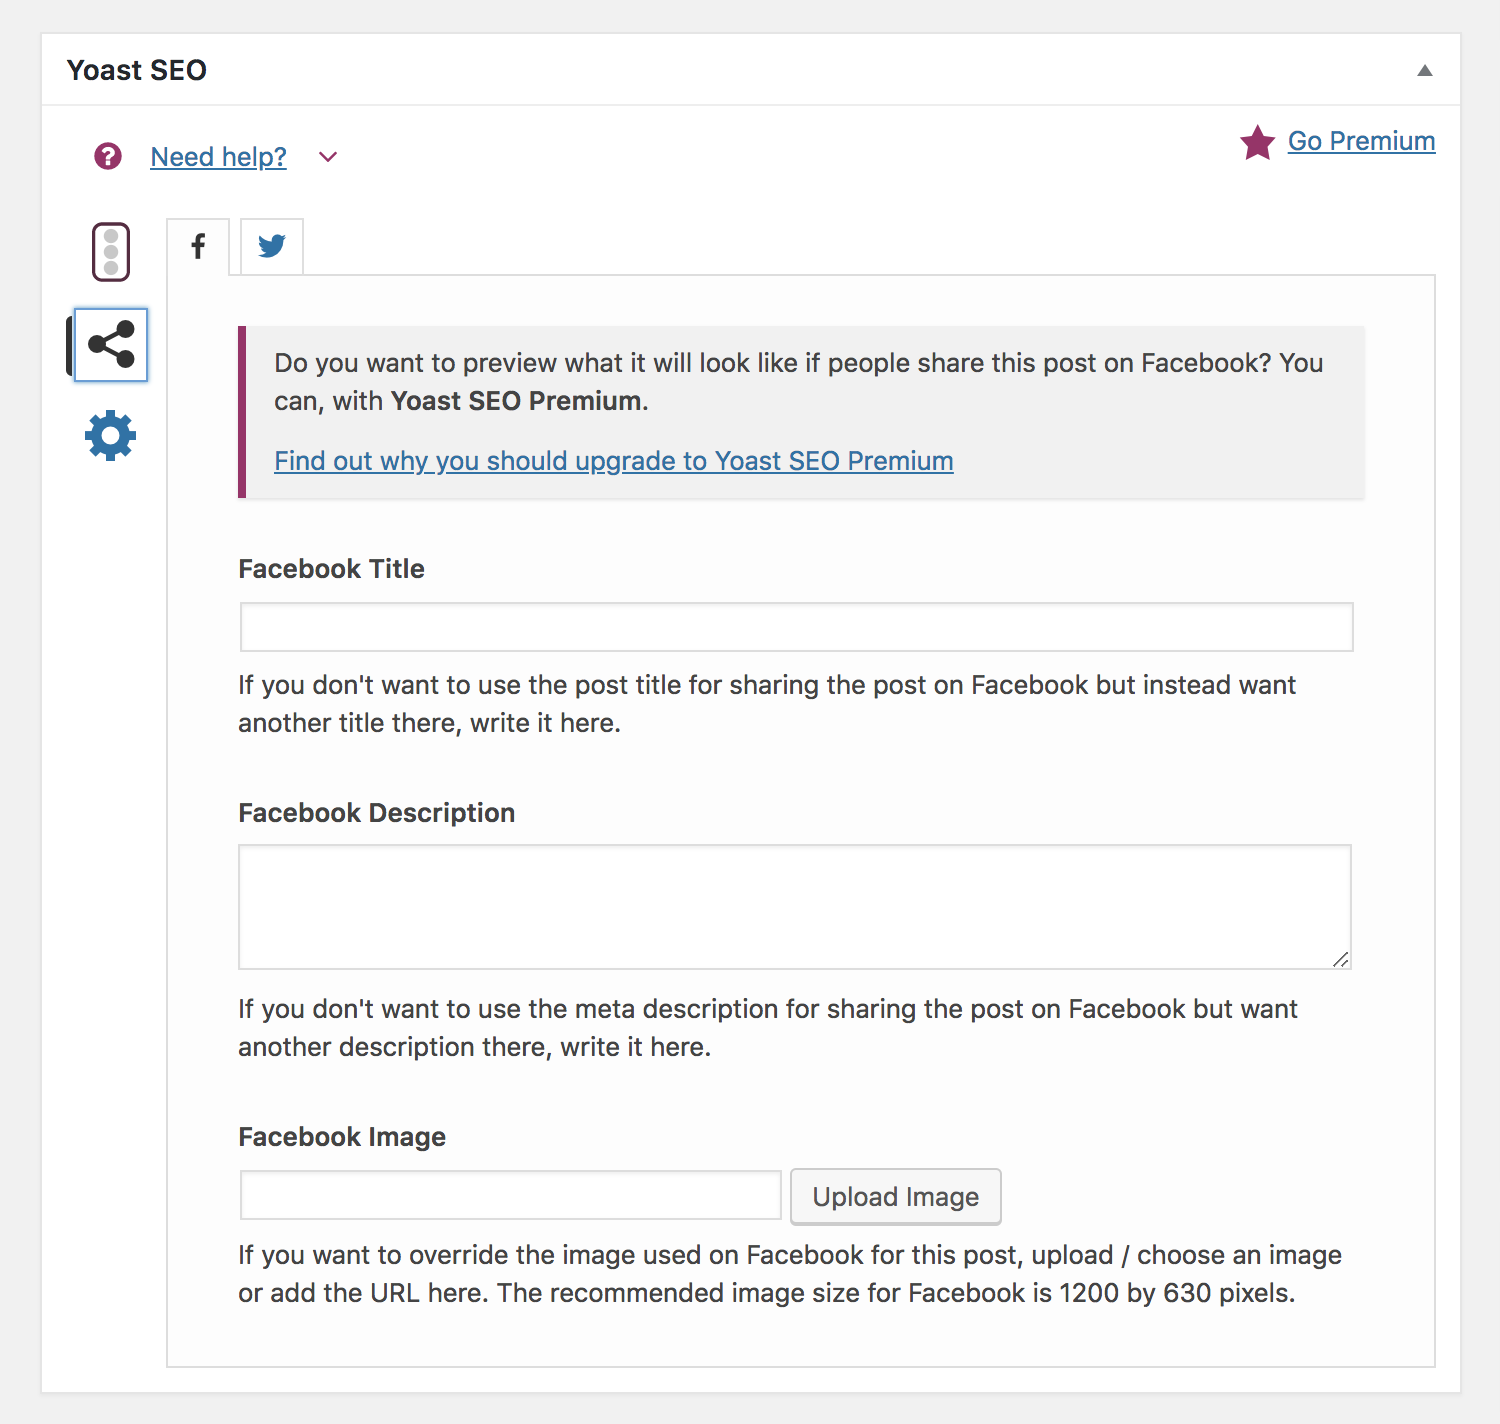
Here is where you customize the text that will appear on Facebook and Twitter when someone shares the link to your site. The social networks create a 'card' with the text and image, so it's important that what you put here gives an accurate representation of your project and site.
Fill out the fields for both the Facebook and Twitter tab, and then click the big blue 'Update' button to save the changes.
EditUI makes it pretty easy to display your special project site on your newspaper website. Special thanks to Rachel Kilroy from the Columbus Dispatch for writing these instructions.
Important:
In order for you to track Google Analytics, visitors must visit your site using the following URL structure. You should use this URL structure when sharing, and you must use this URL as your URL override in EditUI:
http://gatehousenews.com/{yoursitename}/{yourpagename - usually home}/site/{newspaper.com}
For example, if you are the Columbus Dispatch, your site name is Unmasked and you didn't change the page name from Home, your URL would be:
http://gatehousenews.com/unmasked/home/site/dispatch.com
Keep this URL handy as we work through the EditUI directions.
This display on the homepage links directly to the project and allows for three related content pieces. The bar also appears on every page on your site, as a smaller one line bar.
You will need to add your regular publishing taxonomies. We also recommend placing it in the carousel for maximum visibility.
You are welcome to use the 'Custom HTML' widget that is not part of the Architect theme. We make no guarantees that HTML inserted here will work or play nicely with the Architect widgets.
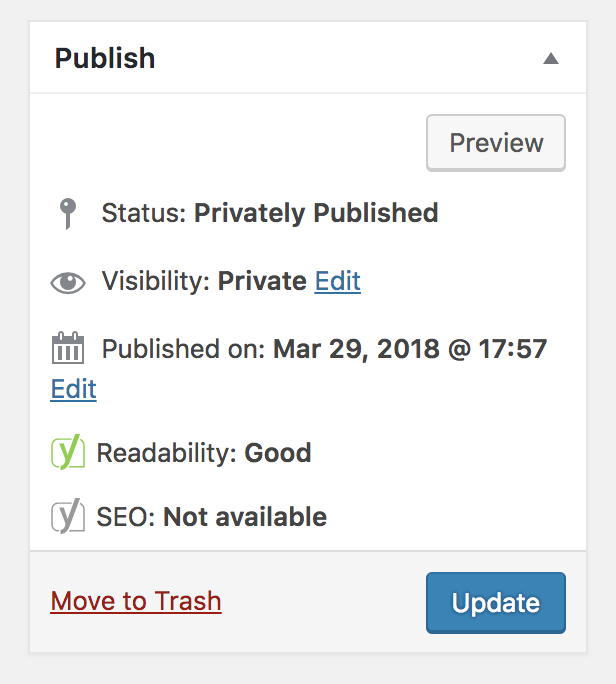
Your WordPress page was not set to Published and Public. To change it, click on the small 'Edit' button next to Visibility and make sure it is 'Public'.
There are two things you need to do in order to create a multi-part series. You will need to set up each part as a separate page, and you will need to create a menu that links to those pages.
Step 1: Create multiple pages
Up to this point, all of our creation has happened in the page that de//space provides to you (typically 'home'). Since this will be a multi-part series, we will need to create each part of the series as a separate page. On the left side of the WordPress editor, hover over 'Pages' and then click 'Add New'.
Give the page a title. WordPress uses this to create the URL, so it's good practice to make this something specific.
Now, click on the tab near the editor to switch from 'Text' to 'Page Builder'. You'll remember that Architect requires use of Page Builder to create pages.
Add widgets and rows like on your previous page to assemble this new section.
Note: Since this is a new page, you will need to completely fill out the Yoast SEO plugin again. For a refresher, see the 'Optimizing for SEO and Social' section of the publishing directions.
Step 2: Customize the menu
At the top of your finished project page is a dark gray bar. If your site has only one page, it makes sense that it would just show your publication's name in the top left. However, if you are doing a multi-part series, you will want to customize this menu so that it shows links to your other pages.
On the left side, hover over 'Appearance' and then 'Customize'
You will be presented with a preview of your page with some options on the left side. Click on 'Menus' and then 'Create New Menu'
Give the menu a standard name like 'Default' or 'Main'
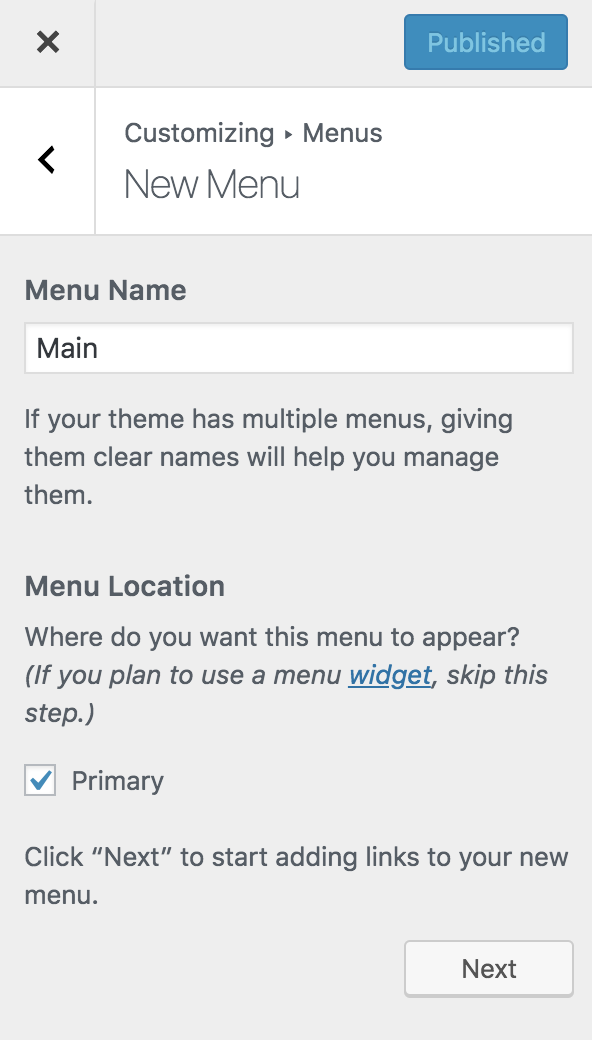
Make sure to check the 'Primary' box.
Click 'Next' and then click the 'Add Items' button. This will pop up a little drawer that shows all of the pages in your site. Click on a page's name to add it to the menu.
When you're done, click the blue 'Publish' button.
You will now see the menu you've created at the top of all of your pages.
But wait — I want to release this series piece-by-piece or day-by-day, not include links to all the stories at once!
You can do this. We do not recommend it, because analytics and analysis of user behavior shows that people do not come back once they've seen a project once. However, to time-delay the release:
• Follow 'Step 1' above and create pages for each part of your project. If you never link to them, no one will see them. Then, when you're ready to release a new part of the project, follow Step 2 and add a link to the new page. You will need to update the menu each time you want to release a new section, but if your pages are already built, this should be a relatively quick process.
To create links within the page, you will need to use HTML anchors. To begin, navigate to Page Builder and click the small wrench icon then 'Edit Row' on the row you want to make a link to.
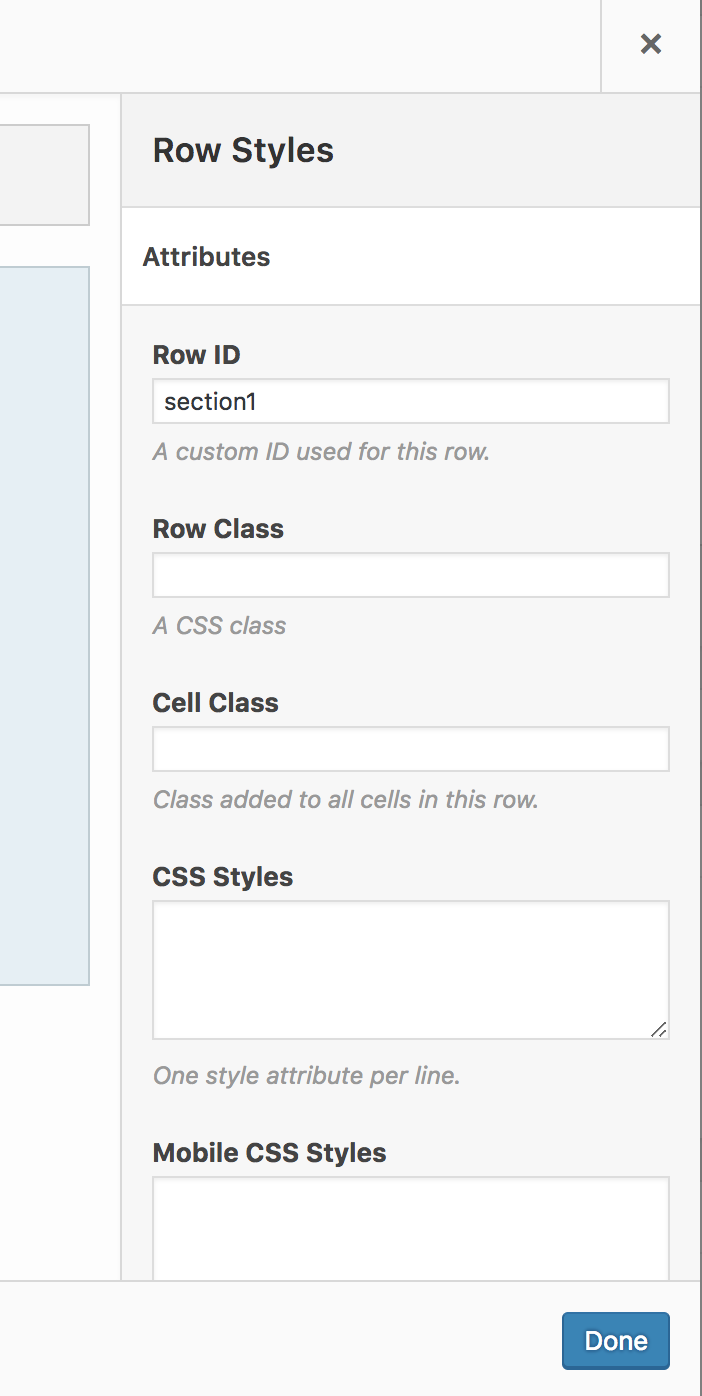
In the 'Row ID' field, type a word you would like to use to identify the section (it cannot contain spaces). Click 'Done'. You will also need to click 'Update' to save the page changes.
This section can now be accessed by adding a forward slash, hash symbol and the keyword to the URL. In the example above, I can access this row by going to gatehousenews.com/{sitename}/home/site/{newspaper.com}/#section1.
You now need to add this long URL with the hash to your site's menu. Hover on 'Appearance' on the left panel of the WordPress editor and click on 'Customize'.
Click on 'Menus' in the left panel, then click on your current menu (or create a new one, if you don't have a primary menu).
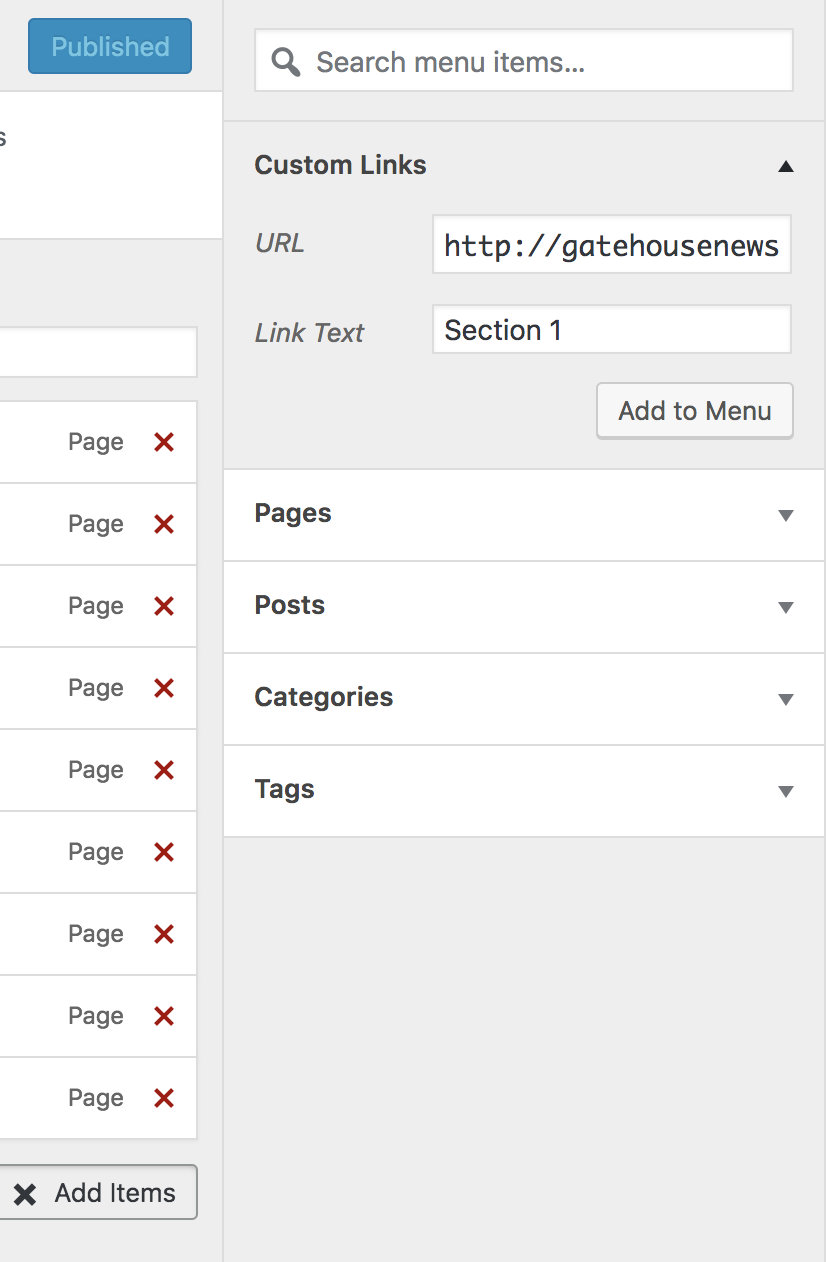
Click on 'Add Items' and then at the top of that little drawer, click 'Custom Links'. In the URL field, type the entire long URL identified above, including the hash. For 'Link Text', put whatever you want readers to see as the link.
Click 'Add to Menu' and then 'Publish'
You can use that long URL (with the hash) to share directly to sections on social media, too. Since this created an anchor on the original page and not a separate page, there's no need to adjust the Yoast SEO plugin.